A realtime app keeps a user up-to-date with the information they want to know, when they need it. A user doesn’t need to constantly refresh a window to get the latest updates, a server behind the app will push updates to the app automatically. In this tutorial I’m going to cover realtime app development by creating a news sharing app with RethinkDB and React Native.
I’m going to assume that you already have experience creating React Native apps so I’m not going to go into detail on each line of code. If you’re a beginner, I recommend you read my previous tutorial, “Build an Android App with React Native“. If you want to follow along, you can find the code on Github.
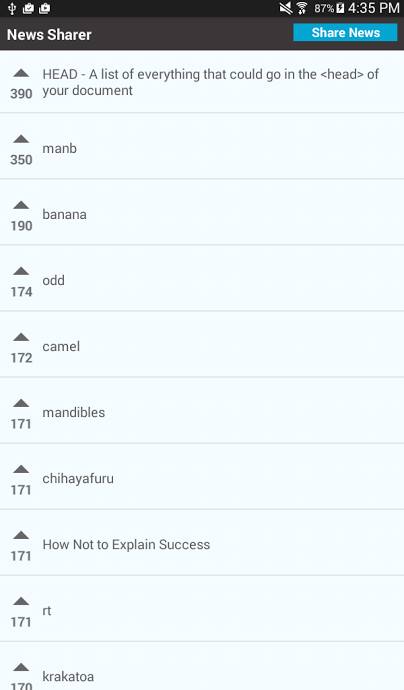
Here’s how the final app will look:
I will start by looking at the code for the mobile app and then move on to the server component which uses Node, Express, Socket.io and RethinkDB.
Install Dependencies
Inside your clone of the project, navigate the NewsSharer directory and execute npm install to install the following dependencies:
- react-native: The React Native framework.
- lodash: Used for manipulating the array of news items so that it’s limited and ordered according to number of votes.
- react-native-modalbox: Used for creating a modal to share a news item.
- react-native-button: A dependency of react-native-modalbox used for creating buttons.
- react-native-vector-icons: Used for creating icons with popular icon sets such as FontAwesome and Ionicons. This is primarily used for creating the icon for the vote button.
- socket.io-client: The client component of Socket.io, a realtime application framework.
Linking Icons
After installing the dependencies, there’s one extra step to get the icons to work, linking them to the app. Do this by using rnpm, the React Native package manager.
Install rnpm with npm:
npm install rnpm -g
Then execute rnpm link in the root of the NewsSharer directory to link the icons.
The App
Below are the contents of the index.android.js file:
import React, { Component } from 'react';
import {
  AppRegistry,
  StyleSheet,
  View
} from 'react-native';

import Main from './components/Main';

class NewsSharer extends Component {

  render() {
    return (
      <View style={styles.container}>
        <Main />
      </View>
    );
  }
}

const styles = StyleSheet.create({
  container: {
    flex: 1,
    justifyContent: 'center',
    alignItems: 'center',
    backgroundColor: '#F5FCFF',
  }
});

AppRegistry.registerComponent('NewsSharer', () => NewsSharer);
This file is the entry-point file for the Android app. If you want to deploy to iOS, you can copy the code into a new index.ios.js file.
The main task of this file does is to import the Main component, where the core of the app is located. This reduces code repetition as you import a component instead of repeating code for each platform.
Main App Component
Inside components/Main.js:
import React, { Component } from 'react';
import {
  AppRegistry,
  StyleSheet,
  Text,
  View,
  TextInput,
  TouchableHighlight,
  Linking,
  ListView
} from 'react-native';

import Button from 'react-native-button';
import Modal from 'react-native-modalbox';
import Icon from 'react-native-vector-icons/Octicons';

import "../UserAgent";
import io from 'socket.io-client/socket.io';

import _ from 'lodash';

var base_url = 'http://YOUR_DOMAIN_NAME_OR_IP_ADDRESS:3000';

export default class Main extends Component {

  constructor(props){
    super(props);

    this.socket = io(base_url, {
      transports: ['websocket']
    });

    this.state = {
      is_modal_open: false,
      news_title: '',
      news_url: '',
      news_items_datasource: new ListView.DataSource({
        rowHasChanged: (row1, row2) => row1 !== row2,
      }),
      is_news_loaded: false,
      news: {},
      news_items: []
    };

  }

  getNewsItems(){

    fetch(base_url + '/news')
      .then((response) => {
        return response.json();
      })
      .then((news_items) => {

        this.setState({
          'news_items': news_items
        });

        var news_datasource = this.state.news_items_datasource.cloneWithRows(news_items);

        this.setState({
          'news': news_datasource,
          'is_news_loaded': true
        });

        return news_items;
      })
      .catch((error) => {
        alert('Error occured while fetching news items');
      });

  }

  componentWillMount(){

    this.socket.on('news_updated', (data) => {

      var news_items = this.state.news_items;
      if(data.old_val === null){

        news_items.push(data.new_val);

      }else{

        _.map(news_items, function(row, index){
          if(row.id == data.new_val.id){
            news_items[index].upvotes = data.new_val.upvotes;
          }

        });

      }

      this.updateUI(news_items);

    });

  }

  updateUI(news_items){
    var ordered_news_items = _.orderBy(news_items, 'upvotes', 'desc');
    var limited_news_items = _.slice(ordered_news_items, 0, 30);
    var news_datasource = this.state.news_items_datasource.cloneWithRows(limited_news_items);

    this.setState({
      'news': news_datasource,
      'is_news_loaded': true,
      'is_modal_open': false,
      'news_items': limited_news_items
    });
  }

  componentDidMount(){
    this.getNewsItems();
  }

  upvoteNewsItem(id, upvotes){

    fetch(base_url + '/upvote-newsitem', {
      method: 'POST',
      headers: {
        'Accept': 'application/json',
        'Content-Type': 'application/json',
      },
      body: JSON.stringify({
        news_id: id,
        upvotes: upvotes + 1
      })
    })
      .catch((err) => {
        alert('Error occured while trying to upvote');
      });

  }

  openModal(){
    this.setState({
      is_modal_open: true
    });
  }

  closeModal(){
    this.setState({
      is_modal_open: false
    });
  }

  shareNews(){

    fetch(base_url + '/save-newsitem', {
      method: 'POST',
      headers: {
        'Accept': 'application/json',
        'Content-Type': 'application/json',
      },
      body: JSON.stringify({
        news_title: this.state.news_title,
        news_url: this.state.news_url,
      })
    })
      .then((response) => {
        alert('News was shared!');
        this.setState({
          news_title: '',
          news_url: ''
        });
      })
      .catch((err) => {
        alert('Error occured while sharing news');
      });

  }

  openPage(url){
    Linking.canOpenURL(url).then(supported => {
      if(supported){
        Linking.openURL(url);
      }
    });
  }

  renderNews(news){
    return (
      <View style={styles.news_item}>
        <TouchableHighlight onPress={this.upvoteNewsItem.bind(this, news.id, news.upvotes)} underlayColor={"#E8E8E8"}>
          <View style={styles.upvote}>
              <Icon name="triangle-up" size={30} color="#666" />
              <Text style={styles.upvote_text}>{news.upvotes}</Text>
          </View>
        </TouchableHighlight>
        <TouchableHighlight onPress={this.openPage.bind(this, news.url)} underlayColor={"#E8E8E8"}>
          <View style={styles.news_title}>
            <Text style={styles.news_item_text}>{news.title}</Text>
          </View>
        </TouchableHighlight>
      </View>
    );
  }

  render(){

    return (
      <View style={styles.container}>
        <View style={styles.header}>
          <View style={styles.app_title}>
            <Text style={styles.header_text}>News Sharer</Text>
          </View>
          <View style={styles.header_button_container}>
            <Button onPress={this.openModal.bind(this)} style={styles.btn}>
              Share News
            </Button>
          </View>
        </View>

        {
          this.state.is_news_loaded &&
          <View style={styles.body}>
            <ListView initialListSize={1} dataSource={this.state.news} style={styles.news} renderRow={this.renderNews.bind(this)}></ListView>
          </View>
        }

        <Modal
          isOpen={this.state.is_modal_open}
          style={styles.modal}
          position={"center"}
        >
          <View style={styles.modal_body}>
            <View style={styles.modal_header}>
              <Text style={styles.modal_header_text}>Share News</Text>
            </View>

            <View style={styles.input_row}>
              <TextInput
                style={{height: 40, borderColor: 'gray', borderWidth: 1}}
                onChangeText={(text) => this.setState({news_title: text})}
                value={this.state.news_title}
                placeholder="Title"
              />
            </View>

            <View style={styles.input_row}>
              <TextInput
                style={{height: 40, borderColor: 'gray', borderWidth: 1}}
                onChangeText={(text) => this.setState({news_url: text})}
                value={this.state.news_url}
                placeholder="URL"
                keyboardType="url"
              />
            </View>

            <View style={styles.input_row}>
              <Button onPress={this.shareNews.bind(this)} style={[styles.btn, styles.share_btn]}>
                Share
              </Button>
            </View>
          </View>

        </Modal>
      </View>
    );
  }
}

const styles = StyleSheet.create({
  container: {
    flex: 1,
    alignSelf: 'stretch',
    backgroundColor: '#F5FCFF',
  },
  header: {
    flex: 1,
    backgroundColor: '#3B3738',
    flexDirection: 'row'
  },
  app_title: {
    flex: 7,
    padding: 10
  },
  header_text: {
    fontSize: 20,
    color: '#FFF',
    fontWeight: 'bold'
  },
  header_button_container: {
    flex: 3
  },
  body: {
    flex: 19
  },
  btn: {
    backgroundColor: "#05A5D1",
    color: "white",
    margin: 10
  },
  modal: {
    height: 300
  },
  modal_header: {
    margin: 20,
  },
  modal_body: {
    alignItems: 'center'
  },
  input_row: {
    padding: 20
  },
  modal_header_text: {
    fontSize: 18,
    fontWeight: 'bold'
  },
  share_btn: {
    width: 100
  },
  news_item: {
    paddingLeft: 10,
    paddingRight: 10,
    paddingTop: 15,
    paddingBottom: 15,
    marginBottom: 5,
    borderBottomWidth: 1,
    borderBottomColor: '#ccc',
    flex: 1,
    flexDirection: 'row'
  },
  news_item_text: {
    color: '#575757',
    fontSize: 18
  },
  upvote: {
    flex: 2,
    paddingRight: 15,
    paddingLeft: 5,
    alignItems: 'center'
  },
  news_title: {
    flex: 18,
    justifyContent: 'center'
  },
  upvote_text: {
    fontSize: 18,
    fontWeight: 'bold'
  }
});

AppRegistry.registerComponent('Main', () => Main);
Breaking down the code above. First import the built-in React Native and third-party components needed.
import React, { Component } from 'react';
import {
  AppRegistry,
  StyleSheet,
  Text,
  View,
  TextInput,
  TouchableHighlight,
  Linking,
  ListView
} from 'react-native';

import Button from 'react-native-button';
import Modal from 'react-native-modalbox';
import Icon from 'react-native-vector-icons/Octicons';

import "../UserAgent";
import io from 'socket.io-client/socket.io';

import _ from 'lodash';
Note that you’re importing custom code here:
import "../UserAgent";
This is the UserAgent.js file that you see at the root of the NewsSharer directory. It contains code to set the user agent to react-native, needed by Socket.io to work, or it will assume that it’s in a browser environment.
window.navigator.userAgent = 'react-native';
Next, the base URL to which the app is going to make requests. If you’re testing locally this can be the internal IP address of your computer. For this to work, you have to make sure that your phone or tablet is connected to the same network as your computer.
var base_url = 'http://YOUR_DOMAIN_NAME_OR_IP_ADDRESS:3000';
Inside the constructor, initialize the socket connection:
this.socket = io(base_url, {
  transports: ['websocket']
});
Set the default app state:
this.state = {
  is_modal_open: false, //for showing/hiding the modal
  news_title: '', //default value for news title text field
  news_url: '', //default value for news url text field
  //initialize a datasource for the news items
  news_items_datasource: new ListView.DataSource({
    rowHasChanged: (row1, row2) => row1 !== row2,
  }),
  //for showing/hiding the news items
  is_news_loaded: false,
  news: {}, //the news items datasource
  news_items: [] //the news items
};
This function fetches the news items from the server, using the built-in fetch method. It performs a GET request to the news route and then extracts the news_items object from the response. This is then used to create the news datasource which required by the ListView component. Once created, it updates the state with the news datasource so that the UI gets updated with the news items in it.
getNewsItems(){

  fetch(base_url + '/news')
    .then((response) => {
      return response.json();
    })
    .then((news_items) => {

      this.setState({
        'news_items': news_items
      });

      var news_datasource = this.state.news_items_datasource.cloneWithRows(news_items);

      this.setState({
        'news': news_datasource,
        'is_news_loaded': true
      });

      return news_items;
    })
    .catch((error) => {
      alert('Error occured while fetching news items');
    });

}
The componentWillMount method is one of React’s lifecycle methods. This allows you to execute code before the initial rendering occurs. This is where you listen for the news_updated event emitted by Socket.io’s server component, and when this event happens, it can be one of two things. When a users shares a news item or when they upvote an existing news item.
RethinkDB’s changefeed returns a null value for the old_val if it’s a new item. This is how you distinguish between the two possibilities. If a user has shared a new news item, push it to the news_items array. Otherwise, look for the upvoted news item and update its upvote count. Now you can update the UI to reflect the changes.
componentWillMount(){

  this.socket.on('news_updated', (data) => {

    var news_items = this.state.news_items;
    if(data.old_val === null){ //a new news item is shared
      //push the new item to the news_items array
      news_items.push(data.new_val);

    }else{ //an existing news item is upvoted
      //find the news item that was upvoted and update its upvote count
      _.map(news_items, function(row, index){
        if(row.id == data.new_val.id){
          news_items[index].upvotes = data.new_val.upvotes;
        }

      });

    }

    //update the UI to reflect the changes
    this.updateUI(news_items);

  });

}
The updateUI function orders the news items by their upvote count, highest to lowest. Once sorted, extract the first 30 news items and update the state.
updateUI(news_items){
  var ordered_news_items = _.orderBy(news_items, 'upvotes', 'desc');
  var limited_news_items = _.slice(ordered_news_items, 0, 30);
  var news_datasource = this.state.news_items_datasource.cloneWithRows(limited_news_items);

  this.setState({
    'news': news_datasource,
    'is_news_loaded': true,
    'is_modal_open': false,
    'news_items': limited_news_items
  });
}
The componentDidMount method is another React lifecycle method invoked after the initial rendering occurs. This is where you fetch the news items from the server.
Note: You can also do this inside the componentWillMount method if you want to make the request before the component is mounted.
componentDidMount(){
  this.getNewsItems();
}
The upvoteNewsItem method makes an upvote news item request to the server.
upvoteNewsItem(id, upvotes){

  fetch(base_url + '/upvote-newsitem', {
    method: 'POST',
    headers: {
      'Accept': 'application/json',
      'Content-Type': 'application/json',
    },
    body: JSON.stringify({
      news_id: id,
      upvotes: upvotes + 1
    })
  })
    .catch((err) => {
      alert('Error occured while trying to upvote');
    });

}
The openModal and closeModal methods show and hide the modal for sharing a news item.
openModal(){
  this.setState({
    is_modal_open: true
  });
}

closeModal(){
  this.setState({
    is_modal_open: false
  });
}
The shareNews function sends a request for creating a news item.
shareNews(){

  fetch(base_url + '/save-newsitem', {
    method: 'POST',
    headers: {
      'Accept': 'application/json',
      'Content-Type': 'application/json',
    },
    body: JSON.stringify({
      news_title: this.state.news_title,
      news_url: this.state.news_url,
    })
  })
    .then((response) => {
      alert('News was shared!');
      this.setState({
        news_title: '',
        news_url: ''
      });
    })
    .catch((err) => {
      alert('Error occured while sharing news');
    });

}
The openPage function opens the URL of the news item in the browser.
openPage(url){
  Linking.canOpenURL(url).then(supported => {
    if(supported){
      Linking.openURL(url);
    }
  });
}
The renderNews function returns the UI for each of the news items. This displays the upvote button, the number of upvotes and the news title. The news title is wrapped inside a TouchableHighlight component. This allows you to execute the openPage function to open the URL. You do the same thing for the upvote count.
Note: The code uses the TouchableHighlight component instead of the Button component because the Button component cannot have View or Text components inside it.
renderNews(news){
  return (
    <View style={styles.news_item}>
      <TouchableHighlight onPress={this.upvoteNewsItem.bind(this, news.id, news.upvotes)} underlayColor={"#E8E8E8"}>
        <View style={styles.upvote}>
            <Icon name="triangle-up" size={30} color="#666" />
            <Text style={styles.upvote_text}>{news.upvotes}</Text>
        </View>
      </TouchableHighlight>
      <TouchableHighlight onPress={this.openPage.bind(this, news.url)} underlayColor={"#E8E8E8"}>
        <View style={styles.news_title}>
          <Text style={styles.news_item_text}>{news.title}</Text>
        </View>
      </TouchableHighlight>
    </View>
  );
}
The render function returns the UI of the whole app.
render(){
    ...
}
Inside the render function you have the header which contains the title of the app and a button for opening the modal for sharing a news item.
<View style={styles.header}>
  <View style={styles.app_title}>
    <Text style={styles.header_text}>News Sharer</Text>
  </View>
  <View style={styles.header_button_container}>
    <Button onPress={this.openModal.bind(this)} style={styles.btn}>
      Share News
    </Button>
  </View>
</View>
For the body, you have the ListView component for rendering the news items. It has three required parameters, initialListSize, dataSource, and renderRow. The initialListSize is set to 1 so that the ListView renders each row one by one over the course of multiple frames. You can also update this to a higher value if you want the rows to appear all at once. The dataSource are the news items and the renderRow is the function for rendering each individual news item row.
{
  this.state.is_news_loaded &&
  <View style={styles.body}>
    <ListView initialListSize={1} dataSource={this.state.news} style={styles.news} renderRow={this.renderNews.bind(this)}></ListView>
  </View>
}
Next is the modal for sharing news. This has two text fields for entering the title and the URL of the news, and a button for submitting it to the server. The text fields uses the TextInput component. There are no labels so add placeholder text to guide the user to what they need to input.
Both text fields have the onChangeText method which updates the value for each one. The keyboardType of url is used for the news URL text field so that it opens the keyboard optimized for entering URL’s in the device. The user is not expected to enter it manually, they could use copy and paste, but this is a ‘nice to have’ in case they decide to enter it manually. Below the text fields is the button for sharing the news. This calls the shareNews function defined earlier.
<Modal
  isOpen={this.state.is_modal_open}
  style={styles.modal}
  position={"center"}
>
  <View style={styles.modal_body}>
    <View style={styles.modal_header}>
      <Text style={styles.modal_header_text}>Share News</Text>
    </View>

    <View style={styles.input_row}>
      <TextInput
        style={{height: 40, borderColor: 'gray', borderWidth: 1}}
        onChangeText={(text) => this.setState({news_title: text})}
        value={this.state.news_title}
        placeholder="Title"
      />
    </View>

    <View style={styles.input_row}>
      <TextInput
        style={{height: 40, borderColor: 'gray', borderWidth: 1}}
        onChangeText={(text) => this.setState({news_url: text})}
        value={this.state.news_url}
        placeholder="URL"
        keyboardType="url"
      />
    </View>

    <View style={styles.input_row}>
      <Button onPress={this.shareNews.bind(this)} style={[styles.btn, styles.share_btn]}>
        Share
      </Button>
    </View>
  </View>

</Modal>
Set the styles for the component:
const styles = StyleSheet.create({
  container: {
    flex: 1,
    alignSelf: 'stretch',
    backgroundColor: '#F5FCFF',
  },
  header: {
    flex: 1,
    backgroundColor: '#3B3738',
    flexDirection: 'row'
  },
  app_title: {
    flex: 7,
    padding: 10
  },
  header_text: {
    fontSize: 20,
    color: '#FFF',
    fontWeight: 'bold'
  },
  header_button_container: {
    flex: 3
  },
  body: {
    flex: 19
  },
  btn: {
    backgroundColor: "#05A5D1",
    color: "white",
    margin: 10
  },
  modal: {
    height: 300
  },
  modal_header: {
    margin: 20,
  },
  modal_body: {
    alignItems: 'center'
  },
  input_row: {
    padding: 20
  },
  modal_header_text: {
    fontSize: 18,
    fontWeight: 'bold'
  },
  share_btn: {
    width: 100
  },
  news_item: {
    paddingLeft: 10,
    paddingRight: 10,
    paddingTop: 15,
    paddingBottom: 15,
    marginBottom: 5,
    borderBottomWidth: 1,
    borderBottomColor: '#ccc',
    flex: 1,
    flexDirection: 'row'
  },
  news_item_text: {
    color: '#575757',
    fontSize: 18
  },
  upvote: {
    flex: 2,
    paddingRight: 15,
    paddingLeft: 5,
    alignItems: 'center'
  },
  news_title: {
    flex: 18,
    justifyContent: 'center'
  },
  upvote_text: {
    fontSize: 18,
    fontWeight: 'bold'
  }
});
The Server Component
Now it’s time to move to the server component of the app, where you’ll learn how to save and upvote news items in RethinkDB, and how to inform the app that a change has happened in the database.
Creating the Database
I’m going to assume that you have already installed RethinkDB on your computer. If not, follow the installation and getting started docs on the RethinkDB website.
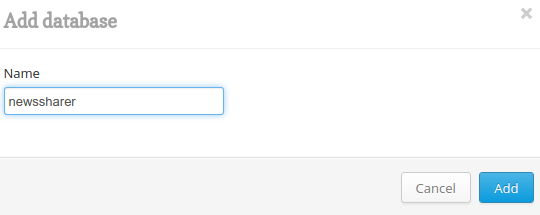
Once that’s done, you can now access http://localhost:8080 in your browser to view the RethinkDB admin console. Click on the Tables tab then click on the Add Database button. This will open a modal box that lets you enter the name of the database, call it ‘newssharer’ and click Add.
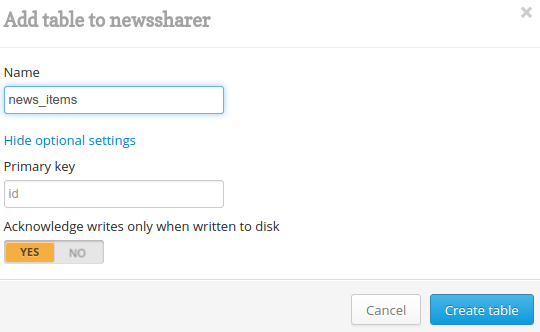
Now create the table where you’re going to save the news items. Click the Add Table button, name it ‘news_items’, then click Create Table.
Install Dependencies
You can install the server dependencies by navigating to the root of the project directory (with the newssharer-server.js and package.json files), and execute npm install to install the following dependencies:
- express: A web framework for Node.js that allows you to create a web server that responds to specific routes.
- body-parser: Allows for easy extraction of a JSON string passed along in the request body.
- rethinkdb: The RethinkDB client for Node.js.
- socket.io: The realtime framework that allows you to communicate to all connected clients when someone shares a news or upvotes an existing news.
The Server-Side Code
Inside newssharer-server.js:
var r = require('rethinkdb');

var express = require('express');
var app = express();

var server = require('http').createServer(app);
var io = require('socket.io')(server);

var bodyParser = require('body-parser');
app.use(bodyParser.json());

var connection;

r.connect({host: 'localhost', port: 28015}, function(err, conn) {
    if(err) throw err;
    connection = conn;

    r.db('newssharer').table('news_items')
        .orderBy({index: r.desc('upvotes')})
        .changes()
        .run(connection, function(err, cursor){

            if (err) throw err;
            io.sockets.on('connection', function(socket){
                cursor.each(function(err, row){
                    if(err) throw err;
                    io.sockets.emit('news_updated', row);
                });
            });
    });

});

app.get('/create-table', function(req, res){
    r.db('newssharer').table('news_items').indexCreate('upvotes').run(connection, function(err, result){
        console.log('boom');
        res.send('ok')
    });
});

app.get('/fill', function(req, res){
    r.db('newssharer').table('news_items').insert([
        {
            title: 'A Conversation About Fantasy User Interfaces',
            url: 'https://www.subtraction.com/2016/06/02/a-conversation-about-fantasy-user-interfaces/',
            upvotes: 30
        },
        {
            title: 'Apple Cloud Services Outage',
            url: 'https://www.apple.com/support/systemstatus/',
            upvotes: 20
        }
    ]).run(connection, function(err, result){
        if (err) throw err;
        res.send('news_items table was filled!');
    });
});

app.get('/news', function(req, res){
    res.header("Content-Type", "application/json");
    r.db('newssharer').table('news_items')
        .orderBy({index: r.desc('upvotes')})
        .limit(30)
        .run(connection, function(err, cursor) {
            if (err) throw err;
            cursor.toArray(function(err, result) {
                if (err) throw err;
                res.send(result);
            });
    });
});

app.post('/save-newsitem', function(req, res){

    var news_title = req.body.news_title;
    var news_url = req.body.news_url;

    r.db('newssharer').table('news_items').insert([
       {
        'title': news_title,
        'url': news_url,
        'upvotes': 100
       },
    ]).run(connection, function(err, result){
        if (err) throw err;
        res.send('ok');
    });

});

app.post('/upvote-newsitem', function(req, res){

    var id = req.body.news_id;
    var upvote_count = req.body.upvotes;

    r.db('newssharer').table('news_items')
        .filter(r.row('id').eq(id))
        .update({upvotes: upvote_count})
        .run(connection, function(err, result) {
            if (err) throw err;
            res.send('ok');
        });
});

app.get('/test/upvote', function(req, res){
    var id = '144f7d7d-d580-42b3-8704-8372e9b2a17c';
    var upvote_count = 350;

    r.db('newssharer').table('news_items')
        .filter(r.row('id').eq(id))
        .update({upvotes: upvote_count})
        .run(connection, function(err, result) {
            if (err) throw err;
            res.send('ok');
        });
});

app.get('/test/save-newsitem', function(req, res){

    r.db('newssharer').table('news_items').insert([
       {
        'title': 'banana',
        'url': 'http://banana.com',
        'upvotes': 190,
        'downvotes': 0
       },
    ]).run(connection, function(err, result){
        if(err) throw err;
        res.send('ok');
    });

});


server.listen(3000);
In the code above, first you import dependencies:
var r = require('rethinkdb');

var express = require('express');

var app = express();

var server = require('http').createServer(app);
var io = require('socket.io')(server);

var bodyParser = require('body-parser');
app.use(bodyParser.json());
Create the variable for storing the current RethinkDB connection.
var connection;
Listening for Changes
Connect to the RethinkDB database, by default RethinkDB runs on port 28015 so that is where you connect. If you’ve used a different port, replace 28015 with the port that you used.
r.connect({host: 'localhost', port: 28015}, function(err, conn) {
    if(err) throw err;
    connection = conn;

    ...

});
Still inside the database connection code, query the news_items table in the newssharer database, ordering the items by their upvotes count. Then use RethinkDB’s Changefeeds feature to listen for changes in the table (a database log of sorts). Every time a change happens in the table (CRUD operations), it’s notified of the change.
r.db('newssharer').table('news_items')
    .orderBy({index: r.desc('upvotes')})
    .changes()
    .run(connection, function(err, cursor){

        ...
});
Inside the callback function for the run method, initialize the socket connection and loop through the contents of the cursor. The cursor represents the changes made in the table. Every time a change occurs, it triggers the cursor.each function.
Note: The function doesn’t contain all the data changes. The previous changes gets replaced whenever a new change is made. This means that it only loops through a single row at any given time. This allows you to send the changes to the client using socket.io.
if (err) throw err; //check if there are errors and return it if any
io.sockets.on('connection', function(socket){
    cursor.each(function(err, row){
        if(err) throw err;
        io.sockets.emit('news_updated', row);
    });
});
Each row has the following structure if a news item is shared:
{
  "old_val": null,
  "new_val": {
    "id": 1,
    "news_title": "Google",
    "news_url": "http://google.com",
    "upvotes": 0
  }
}
This is why you checked for null earlier, because a newly shared news item won’t have an old_val.
If a user upvotes a news item:
{
  "old_val": {
    "id": 1,
    "news_title": "Google",
    "news_url": "http://google.com",
    "upvotes": 0
  }
  "new_val": {
    "id": 1,
    "news_title": "Google",
    "news_url": "http://google.com",
    "upvotes": 1
  }
}
It returns both the whole structure for the old value and the new value of the row. This means you can update more than one field in one client and send those changes to all the other connected clients. RethinkDB makes implementing realtime apps simple with it’s changfeeds feature.
Adding an Index to the Upvotes Field
This is the route that adds an index to the upvotes field:
app.get('/add-index', function(req, res){
    r.db('newssharer').table('news_items').indexCreate('upvotes').run(connection, function(err, result){
        res.send('ok')
    });
});
You need this for the orderBy function to work, because it needs the field you are sorting with to have an index.
.orderBy({index: r.desc('upvotes')})
When the server is running, make sure to open http://localhost:3000/add-index in you browser before you test out the app. This route only needs to be called once.
Adding Dummy News Items
This route inserts dummy entries to the news_items table. This is optional for testing purposes so that you can see news items immediately without having to add them through the app.
app.get('/fill', function(req, res){
    r.db('newssharer').table('news_items').insert([
        {
            title: 'A Conversation About Fantasy User Interfaces',
            url: 'https://www.subtraction.com/2016/06/02/a-conversation-about-fantasy-user-interfaces/',
            upvotes: 30
        },
        {
            title: 'Apple Cloud Services Outage',
            url: 'https://www.apple.com/support/systemstatus/',
            upvotes: 20
        }
    ]).run(connection, function(err, result){
        if (err) throw err;
        res.send('news_items table was filled!');
    });
});
Returning News Items
This route returns the news items:
app.get('/news', function(req, res){
    res.header("Content-Type", "application/json");
    r.db('newssharer').table('news_items')
        .orderBy({index: r.desc('upvotes')})
        .limit(30)
        .run(connection, function(err, cursor) {
            if (err) throw err;
            cursor.toArray(function(err, result) {
                if (err) throw err;
                res.send(result);
            });
    });
});
The news items are ordered from the highest upvote count to the lowest and limited to 30. Instead of using cursor.each to loop through the news items, use cursor.toArray to convert it to an array with the following structure:
[
    {
        "title": "A Conversation About Fantasy User Interfaces",
        "url": "https://www.subtraction.com/2016/06/02/a-conversation-about-fantasy-user-interfaces/",
        "upvotes": 30
    },
    {
        "title": "Apple Cloud Services Outage",
        "url": "https://www.apple.com/support/systemstatus/",
        "upvotes": 20
    }
]
Creating a News Item
This route saves a news item:
app.post('/save-newsitem', function(req, res){

    var news_title = req.body.news_title;
    var news_url = req.body.news_url;

    r.db('newssharer').table('news_items').insert([
       {
        'title': news_title,
        'url': news_url,
        'upvotes': 100
       },
    ]).run(connection, function(err, result){
        if (err) throw err;
        res.send('ok');
    });

});
This is called when a user shares a news item in the app. It accepts the news title and URL from the request body. The initial upvote count is set to 100 but you can pick another number.
Upvoting a News Item
This is the route for upvoting a news item:
app.post('/upvote-newsitem', function(req, res){

    var id = req.body.news_id;
    var upvote_count = req.body.upvotes;

    r.db('newssharer').table('news_items')
        .filter(r.row('id').eq(id))
        .update({upvotes: upvote_count})
        .run(connection, function(err, result) {
            if (err) throw err;
            res.send('ok');
        });
});
This is called when a user upvotes a news item in the app. It uses the ID of the news item to fetch and then update it.
Note: You’ve already incremented the upvotes inside the app so are supplying the value that’s in the request body.
Test Saving and Upvoting News Items
I’ve also included a couple of routes for testing saving and upvoting news items. The best time to access these is when the app is already running on your device. That way, you’ll see that the UI is updated. How to run the app will be covered in the next section.
This is the route for testing saving a news item:
app.get('/test/save-newsitem', function(req, res){

    r.db('newssharer').table('news_items').insert([
       {
        'title': 'banana',
        'url': 'http://banana.com',
        'upvotes': 190,
        'downvotes': 0
       },
    ]).run(connection, function(err, result){
        if(err) throw err;
        res.send('ok');
    });

});
And this is the route for testing the upvoting of a news item. Be sure to replace the ID with the ID of an existing news item to make it work.
app.get('/test/upvote', function(req, res){
    var id = '144f7d7d-d580-42b3-8704-8372e9b2a17c';
    var upvote_count = 350;

    r.db('newssharer').table('news_items')
        .filter(r.row('id').eq(id))
        .update({upvotes: upvote_count})
        .run(connection, function(err, result) {
            if (err) throw err;
            res.send('ok');
        });
});
Running the Server
At this point I assume that RethinkDB is still running in the background. Run it if it’s not already running. Once it’s running, execute node newssharer-server.js at the root of the project directory to run the server component of the app.
Running the App
You can run the app the same way you run any React Native app. Below are the links for running the app in the platform of your choice:
If you’re having a trouble running the app, you can check the Common Problems section on my previous article on Building an Android App with React Native.
Once the app is running, try it out or access any of the test routes in your browser.
What’s Next
Here are some suggestions for further improving the app:
- Instead of opening the news items in the default web browser app of the device, use React Native’s WebView component to create a webview used within the app.
- The app allows users to repeatedly tap on the upvote button, add a function to check whether the current user has already upvoted the news item.
- Set the server to only accept requests coming from the app.
And that’s it! In this tutorial you created a realtime news sharing app and learned how to use Socket.io and RethinkDB’s changefeeds to create a realtime app.
Frequently Asked Questions on Realtime App Development with RethinkDB and React Native
How do I install RethinkDB in my React Native project?
To install RethinkDB in your React Native project, you need to first ensure that you have Node.js and npm installed on your system. Once you have these prerequisites, you can install RethinkDB using npm by running the command npm install rethinkdb. After the installation, you can import RethinkDB into your project by adding var r = require('rethinkdb') at the top of your JavaScript file.
How can I connect my React Native app to a RethinkDB database?
To connect your React Native app to a RethinkDB database, you need to use the r.connect() method provided by the RethinkDB driver. This method takes an object as an argument, which should contain the host and port of your RethinkDB server. Once the connection is established, you can use the r.db() method to select your database.
How do I perform CRUD operations in RethinkDB?
RethinkDB provides a rich query language that allows you to perform CRUD (Create, Read, Update, Delete) operations. To create a new document, you can use the r.table().insert() method. To read data, you can use the r.table().get() method. To update a document, you can use the r.table().get().update() method. And to delete a document, you can use the r.table().get().delete() method.
How can I listen for changes in my RethinkDB database in real-time?
RethinkDB provides a feature called “changefeeds” that allows you to listen for changes in your database in real-time. You can use the r.table().changes() method to create a changefeed. This method returns a cursor that you can iterate over to receive updates about changes in your database.
How do I handle errors in RethinkDB?
RethinkDB provides several error types that you can catch and handle in your code. These include r.Error, r.ReqlDriverError, r.ReqlServerError, r.ReqlRuntimeError, r.ReqlCompileError, and r.ReqlNonExistenceError. You can catch these errors using a try-catch block and handle them appropriately.
How can I secure my RethinkDB database?
RethinkDB provides several security features that you can use to secure your database. These include user authentication, permission management, and SSL encryption. You can set up user authentication by creating users and assigning them passwords. You can manage permissions by assigning roles to users. And you can set up SSL encryption by generating a self-signed certificate and configuring your RethinkDB server to use it.
How do I optimize my RethinkDB queries for performance?
RethinkDB provides several features that you can use to optimize your queries for performance. These include secondary indexes, compound indexes, and geospatial indexes. You can create a secondary index using the r.table().indexCreate() method. You can create a compound index by passing an array of field names to the indexCreate() method. And you can create a geospatial index by passing a function that returns a r.point() to the indexCreate() method.
How do I migrate data from another database to RethinkDB?
RethinkDB provides a tool called “rethinkdb import” that you can use to migrate data from another database. This tool supports several formats, including CSV, TSV, and JSON. You can use this tool by running the command rethinkdb import -f <file> -t <table>.
How do I backup and restore my RethinkDB database?
RethinkDB provides a tool called “rethinkdb dump” that you can use to backup your database. This tool creates a tar.gz file that contains your data and a JavaScript file that contains your schema. You can restore your database using the “rethinkdb restore” tool, which takes the tar.gz file created by the “rethinkdb dump” tool as an argument.
How do I scale my RethinkDB database?
RethinkDB provides several features that you can use to scale your database. These include sharding and replication. You can set up sharding by dividing your data across multiple servers. You can set up replication by creating multiple copies of your data on different servers. You can configure these features using the r.table().reconfigure() method.
 Wern Ancheta
Wern is a web developer from the Philippines. He loves building things for the web and sharing the things he has learned by writing in his blog. When he's not coding or learning something new, he enjoys watching anime and playing video games.